Intro

Previously we created a very limited artillary-style game. In our game the gorillas stood
on a level field. To make our game more like the classic we need to add buildings.
We want do this in a way where the buildings change every time the game is played.
I made this feature an entirely different post to show how a seemingly small and innocuous
feature to a game can turn out to take a lot of time. Adding our buildings introduces these topics:
- procedurally generated environments
- tilemaps
"Procedurally" Generate Building!
"Procedurally generated" means certain game elements are created programatically at runtime instead of statically
up front. Procedurally generated game elements often times make use of some kind of random number generator.
Web browsers provide the function "Math.random()" to help us with this. For example instead of encoding
the position of a baddie as position(100, 200) we can add some variation in it so that the baddie shows up in a different
position every time the game is played like:
    baddie.position.x = 100 + randomInt(-50,50);
    baddie.position.y = 200 + randomInt(-50,50);
Taking a look at the original gorillas screenshots online the buildings are made up little windows that are
somtimes on and off, and between 3 and 7 windows wide and 3 and 12 windows tall with a little space
inbetween all of them. The buildings are one of 3 different colors.

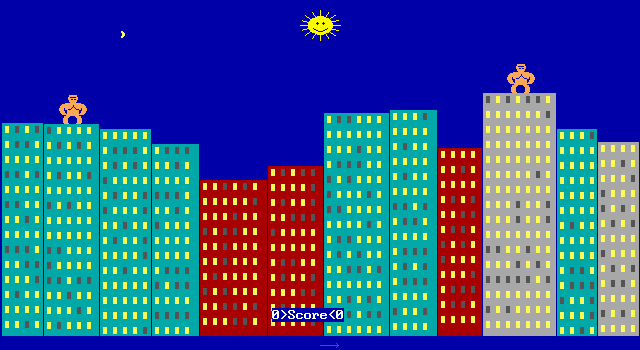
We can translate this almost directly into a building creating function:
    function createBuilding() {
        let building = {
                numWindowsWide: randomInt(4, 7),
                numWindowsTall: randomInt(3, 7),
                color: randomInt(1, 3)
            };

        return building;
    }
There is no "randomInt(min, max)" function in JS but we can build one using Math.random() which
returns a number that is greater than or equal 0 but *strictly less than* 1. This means
if we multiply the value of Math.random() times a number, let's say 20, it will be between
0 and 19.999999 but never get to 20. If we just round down to the nearest int, we get a
range of 0 to 19. All we have to do is add 1 if we want to shift that range to 1 to 20. The
function will look like this:
    function randomInt(min, max) {
        return Math.floor(Math.random()*(max - min + 1) + min);
    }
We use "floor" to round down.
We're almost ready to create mulitple buildings! We will start at the left of the screen (ie x == 0) and continue
adding buildings to the left until we are off the screen (ie greater than screenWidth).
First we have to know how to translate "numWindowsWide" and "numWindowsTall" to a physical pixel size. We can
build our buildings out of blocks of windows. We can visualize a window block like this:

In order to know the physical width of the buildings we have to define the following amounts:
- winWidth
- winHeight
- winMargin
With these amounts we can compute the total width AND height of the building like so:
- buildingWidth = numWindowsWide*(winWidth + 2*winMargin)
- buildingHeight = numWindowsTall*(winHeight + 2*winMargin)
We can add the building width and height into our "createBuilding()" function and use it
to create a "generateBuildings()" function. Our building generation function will look something like this:
    function createBuilding() {
        let building = {
                numWindowsWide: randomInt(4, 7),
                numWindowsTall: randomInt(3, 7),
                color: randomInt(1, 3)
            };

        building.width = building.numWindowsWide*winWidth + 2*winMargin;
        building.height = building.numWindowsTall*winHeight + 2*winHeight;

        return building;
    }

    function generateBuildings(screenWidth) {
        let buildings = [];
        let x = 0;

        //keep generating buildings until
        //I am off the screen.

        while( x < screenWidth ) {
            let building = createBuilding();

            building.x = x;

            buildings.push( building );

            x += building.width + buildingSpacing;
        }

        return buildings;
    }
On/Off Window Tilemap
The last thing we are missing is keeping track of which little windows are on and off.
We will have to store the state of each little window in a rectangular matrix held in each building.
In the matrix we will store 1 for on and 0 for off. Even though there is no native "matrix"
in JS it is very easy to represent one as a simple array.
We will represent the matrix as a simple list that is numWindowsWide X numWindowsTall elements.
The matrix will be attached to the building in the "createBuilding()" function.
For example, let's say we have a building that is 3 windows wide, and 4 windows tall we want a
matrix that looks like this:
     [ 1, 1, 0,
       1, 0, 1,
       1, 1, 1,
       0, 1, 1 ]
Notice that is just a regular array of numbers. We're just intepreting every 3 numbers to be a "row".
There is a total of 12 windows which is just (width X height). We can store the windows in a single
list like so:
    windowLights = [
           1, 1, 0,
           1, 0, 1,
           1, 1, 1,
           0, 1, 1 ];
The entries are just formatted to look like a matrix that has 4 rows and 3 columns but really it's
a simple array:
     windowLights = [ 1, 1, 0, 1, 0, 1, 1, 1, 1, 0, 1, 1 ];
                      ^^^^^^^  ^^^^^^^  ^^^^^^^  ^^^^^^^
                       row 0    row 1    row 2    row 3
Even though we are thinking of the numbers as a rectangular matrix, JS only provide us a way to
address the windows with a single index. We can translate a row and column to the list index using this handy formula:
index = width*row + col
**BURN** that formulat in your head. Representing a rectanglular matrix as a simple array or list is used
in many many places.
Now that we have a way to represent our "lights" it's pretty easy to think of using our "randomInt" function generate a random number between 0 and 1
where 0 is "off" and 1 will be "on". However if we look at the screen shot the number of "on" windows is higher
than the number of off windows. We need a way to control the ratio of 1's to 0's.
Using "randomInt(0, 1)" a 50/50 split.
Instead we will use the Math.random() function directly. Remember that it returns a smooth number inbetween
0 and 1. If we wanted wanted the ratio to "on" and "off" to be 70% we just have to do something like this:
    function getRandomOnOff(ratio) {
        if( Math.random() < ratio ) {
            return 1;
        }
        return 0;
    }
Our random window on/off builder looks something like this:
    function buildWindowOnOffMatrix(onOffRatio, numWindowsWide, numWindowsTall) {
        let windows = [];
        let numWindows = numWindowsWide*numWindowsTall;

        for(let i = 0; i < numWindows; i++) {
            windows.push( getRandomOnOff(onOffRatio) );
        }

        return window;
    }
We can modify our generateBuildings function to include this by adding:
building.windows = buildWindowOnOffMatrix(onOffRatio, building.numWindowsWide, building.numWindowsTall);
Render Buildings
We now have captured almost everything we have identified we needed to display our buildings:
- list of buildings
- window width
- window height
- window on/off
- building size in terms of window
- building spacing (via the building's "x" property).
We assigned the building color to be a number between 1 and 3. It's down to turn that into actual
web colors. Opening up the above screen shot and using the eyedropper tool (in Gimp or Photoshop or whatever else you use)
to get colors I get these colors:
- window on - #fcfe54
- window off - #545654
- red building - #ac0204
- green building - #04aaac
- gray building - #acaaac
The buildings can be drawn entirely with the "fillRect" method. Notice the buildings are aligned on the bottom.
This means we need to defined some kind of "floor" which allows us to define the building's y coordinate. We add
the following line to "createBuilding()".
building.y = buildingFloor - building.height;
Now that we get the building's color, x, y, width and heigth the buildings can be drawn with a simple
call to fillRect(...). The windows are a little trickier. Remember the windows are just a stupid list
of 0's and 1's we are treating as a rectangular matrix. We have no information other than the position
of the matrix and the 0 or 1. It turns this is all we need. We already know the winWidth and the winHeight.
We just need to compute the x and y. Given the "row" and "col" of the window this is very straightforward.
We know how big each window block is:
    winBlockWidth = winWidth + 2*winMargin;
    winBlockHeight = winHeight + 2*winMargin;
The x and y of the window itself is x + margin and y + margin of the start of the block. Given a window row
and window col the window x and y is:
    x = col*winBlockWidth + winMargin;
    y = row*winBlockHeight + winMargin;
If we define a color list like this:
winColors = ["#545654", "#fcfe54"];
Remembering how to translate a row, col to index we can now build a "drawWindow" function:
    function drawWindow(building, row, col, ctx) {
        let blockWidth = winWidth + 2*winMargin,
            blockHeight = winHeight + 2*winMargin,
            x = col*blockWidth + winMargin + building.x,
            y = row*blockHeight + winMargin + building.y,
            i = row*building.numWindowsWide + col,
            onOrOff = building.matrix[i];

            ctx.fillStyle = winColors[onOrOff];
            ctx.fillRect(x, y, winWidth, winHeight);
    }
Notice that we add in the building's x and y to move the window relative to the building.
Now we just have to iterate over all the rows and columns and we have our final draw method:
    function drawWindows(building, ctx) {
        for(let row = 0; row < building.numWindowsTall; row++) {
            for(let col = 0; col < building.numWindowsWide; col++) {
                drawWindow(building, row, col, ctx);
            }
        }
    }
Here is an example. Notice that building edges don't line up to the right if the winWidth, margin and
building spacing aren't chosen correctly.
Placing Gorillas
Now that we can build our buildings, where do we place our gorillas? A quick and easy approach is
that player1 goes on top of one of the first 3 buildings, and player2 goes on one of the last 3 buildings.
We will then horizontally center the gorilla over the building. The center of an edge is always "start + width/2".
Centering two edges is easiest to visualize using two moves. One to move the left edge of the gorrilla to the middle
of the building and then to move that edge back to the middle of the gorilla.
The first move then is:
gorilla.x = building.x + building.width/2;
We then move the gorilla back half way:
gorilla.x = building.x + building.width/2 - gorilla.width/2;
Our gorilla placement function will look like this:
    function placeGorrila(gorilla, building) {
        gorilla.x = building.x + building.width/2 + gorilla.width/2;
        gorilla.y = building.y - gorilla.height;
    }

    function placeGorrilasOnBuildings(player1, player2, buildings) {
        //this does not do any range checking on buildings and assumes
        //buildings.length >= 3

        let building = buildings[ randomInt(0, 2) ];

        placeGorrila(player1, building);

        building = buildings[ buildings.length - 1 - randomInt(0, 2) ];

        placeGorrila(player2, building);
    }
Now we can add our gorillas (ie brown blocks) to our last example:
For fun, read the sub routine "MakeCityScape" starting on line 1411 in the original GORILLA.BAS source code.
It is actually more sophisticated than our method. It chooses a pattern randomly (continuously upward sloping, downward sloping, "V"
or inverted "V"). The window width is 3 and the window height is 6! It's fun to read through even if you don't know Microsoft QBasic.